Field note 003 · Measure
Run a five-point digital kitchen scale audit
A scale can display grams and still be the wrong tool for the job. Test the center, edges, tare, small-load response, useful capacity, and timer behavior before a large mixing bowl hides the display halfway through a recipe.
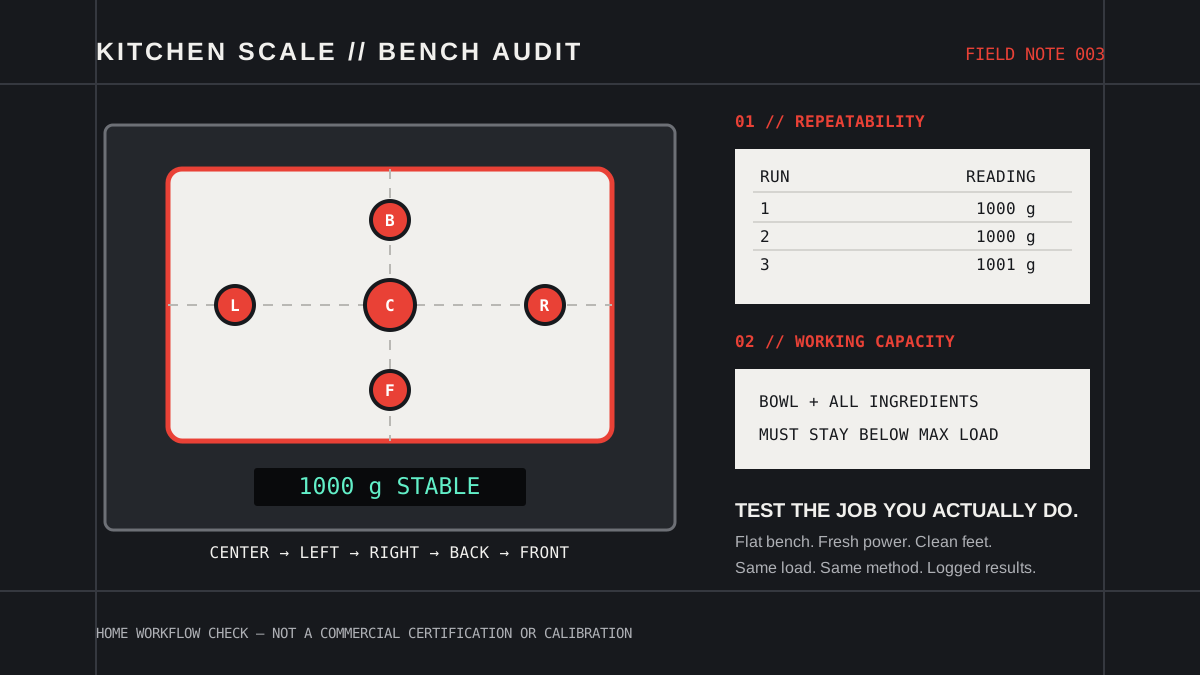
The question is not whether a kitchen scale shows the same number as a legal-for-trade counter scale. The useful question is whether it behaves consistently for the work you ask it to do: a 900-gram bread dough, a bowl that blocks the display, several tared additions, or a few grams of salt or yeast.
NIST’s current kitchen guidance says to choose capacity from the gross weight of the usual recipe—the bowl plus every ingredient—and to tare before a new measurement. Pressing tare hides the bowl’s displayed weight; it does not remove that weight from the load cell or give the scale extra capacity.
A home check can reveal drift, poor placement response, an impractical display, or a mismatch between resolution and recipe. It cannot certify accuracy or make a scale suitable for commercial transactions. Follow the maker’s calibration procedure and use the specified calibration mass when one is provided. Commercial weighing is governed by applicable weights-and-measures rules.
1. Write down the scale you actually own
Start with the manual and the markings on the scale. Record maximum capacity, displayed increment, approved power source, minimum operating temperature if stated, overload warning, calibration instructions, and whether tare reduces the remaining display range. Do not infer accuracy from the number of decimal places alone. A display increment tells you the smallest step shown; it does not prove that every displayed value is correct.
| Specification | Why it matters | Bench question |
|---|---|---|
| Maximum capacity | The bowl and all ingredients count toward the physical load even after tare. | Does the heaviest normal batch leave a sensible margin below the limit? |
| Displayed increment | A 1-gram display cannot show tenths of a gram, and rounding affects tiny additions. | Is the increment small enough for the least ingredient you routinely weigh? |
| Platform size | An oversized bowl may touch the counter, load an edge, or cover the controls and display. | Can the bowl sit fully on the platform without outside contact? |
| Tare behavior | Repeated taring can hide how much gross load is already on the scale. | Can you track gross load before capacity is reached? |
| Auto-off timing | A sleeping scale can lose the running measurement during slow prep. | Does it remain active through the longest normal pause? |
| Cleaning limits | Flour, oil, moisture, or debris under feet and controls can disrupt use. | Can the platform and feet be cleaned without pressing the mechanism? |
NIST’s weighing guidance treats suitability, accuracy, capacity, and minimum load as separate selection questions. That framework is useful at home even though this audit does not apply legal tolerances. One scale may handle dough bowls well but respond poorly to a two-gram addition; a smaller-capacity instrument may be a better companion for very small quantities.
2. Stabilize the bench before blaming the scale
- Choose a hard, level surface. Keep the scale off a flexible board, folded towel, appliance top, or uneven grout line.
- Clear every contact. The platform, bowl, cord, and food must not touch the wall, backsplash, utensil, or your hand.
- Inspect the feet. Remove crumbs and confirm every foot contacts the same surface. Do not press on the platform while cleaning.
- Control air and vibration. Move away from a fan, open window, running mixer, slamming drawer, or wobbly table.
- Use reliable power. Replace weak batteries or use the specified adapter. Let the scale acclimate after a large temperature change.
- Zero without a load. Wait for a stable zero and follow the maker’s warm-up instructions, if any.
Use a stable test object whose mass is unlikely to change during the session. A maker-specified calibration weight is preferable when the manual calls for one. A bag of food, measuring cup of water, loose coins, or a phone may help compare repeated readings, but none is a certified reference mass. Water volume changes with temperature and reading technique, packages vary, and ordinary objects do not provide traceability.
3. Check repeatability before absolute accuracy
NIST Handbook 44 uses repeatable measurements, increasing loads, decreasing loads, and shifted load positions in formal scale evaluation. A home audit borrows the logic while avoiding commercial pass/fail tolerances.
- Place the test object in the center and wait for the stable indication.
- Record the result without rounding it further.
- Remove the object and confirm the display returns to zero.
- Wait the same interval, then replace the object in the same orientation.
- Repeat at least five times. Do not tare between runs unless you also record the zero failure.
Look at the spread between the highest and lowest readings, not only the average. If the same object produces a range larger than the maker’s stated tolerance or several display increments, repeat with fresh power and a different stable surface. Persistent variation is a service, reassignment, or replacement signal.
Repeatability log
Record the displayed value, room conditions, battery state, and any delay before the reading settled. Keep the method identical.
4. Move one load through five positions
A bowl rarely presses the platform in exactly the same place every time. NIST’s formal shift tests move a known load to prescribed platform positions to reveal changes caused by load location. For a home check, use a moderate stable load safely within capacity and small enough to sit fully at each position.
- Record the centered reading.
- Move the same object midway toward the left edge; wait and record.
- Repeat at the right, back, and front.
- Keep the object fully supported and use the same orientation.
- Return it to the center and record once more.
Do not use half capacity merely because a commercial procedure does; the home scale’s instructions control what is safe. Compare the readings with one another and the manufacturer’s performance statement. A consistent edge difference can explain why a wide bowl gives different results when nudged, or why pressing a tare button beside the platform changes the number.
5. Test tare as part of a full recipe
NIST defines tare as accounting for the container so the scale can determine net product weight. In the kitchen, tare also creates a workflow hazard: after several zero resets, the display no longer reminds you how much total load is on the mechanism.
Run a dry rehearsal with the largest bowl and stable packaged items that approximate a common batch. Record the empty bowl’s gross weight. Tare it, add the first load, wait, and record. Tare again and continue. Before the final addition, restart without tare and check the gross total if the maker permits that workflow. Never mix, knead, cut, or press ingredients while the bowl sits on the scale; NIST’s Metric Kitchen guidance advises removing the bowl to a stable surface before mixing to avoid damage.
Confirm the tare control is reachable with the largest bowl in place and that pressing it does not rock the platform. If the display disappears under the bowl, a pull-out or remote display may be needed. If auto-off activates during the usual pause for sifting or fetching an ingredient, that is a workflow failure even when readings are consistent.
6. Test the smallest real ingredient separately
Recent baking discussions repeatedly raise the same problems: a scale that does not notice a slow addition, a tare that drifts by one or two grams, and one instrument expected to handle both a heavy dough bowl and a tiny quantity of yeast. Treat those reports as questions to test, not proof about a brand.
Choose the smallest ingredient amount in a trusted recipe. Use a clean secondary cup so you can remove the ingredient if the display lags. Add it in distinct increments rather than an almost continuous trickle, allowing the display to settle each time. Repeat several times with the same technique. If the amount is near the display increment or below the manufacturer’s reliable range, use a suitable smaller-capacity scale or the recipe’s verified alternative measure. More decimal places help only when the instrument delivers stable results in that range.
Do not improvise calibration by assuming a household item has an exact mass. If accuracy matters enough to calibrate, use the weight and procedure specified by the manufacturer. If no procedure or tolerance is documented, record that as a buying-guide gap.
7. Make a keep, reassign, or replace decision
Consistent and matched
Repeat readings cluster within documented performance, position changes are acceptable, the full recipe stays below capacity, and the display and timer support the workflow.
Useful for a narrower job
The scale is repeatable for larger prep loads but not tiny ingredients, or its platform fits meal-prep containers better than mixing bowls.
Documented adjustment exists
The maker provides a safe calibration or service procedure and the scale is otherwise suitable. Follow it exactly, then rerun the audit.
Unstable or mismatched
It fails to return to zero, readings wander, edge loading changes results materially, capacity is routinely exceeded, or controls make normal use unreliable.
A strong product brief should disclose capacity, displayed increment, minimum practical load or accuracy statement, platform and overall dimensions, display clearance, tare behavior, auto-off timing, power, overload indication, calibration process, cleaning limits, warranty, and service path. Brand reputation cannot substitute for those specifications.
Use the workspace planner to map the Measure job, compare the listing standard, and read the adjacent two-board prep station guide.