Field note 004 · Cool + store
Cool soup and chili without parking the stockpot.
A large batch needs a closeout plan: clean shallow containers, refrigerator space, a working cold-zone thermometer, and a clock that starts when cooking or hot holding ends.
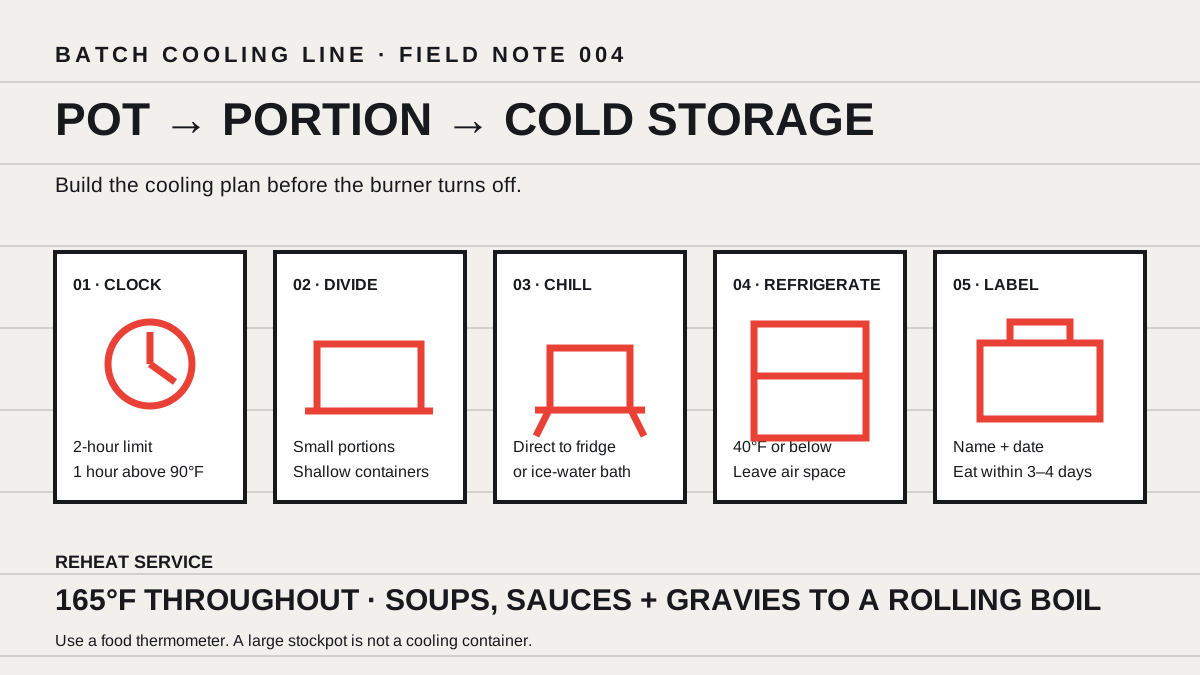
Do not wait for a full pot to become cool on the counter. USDA says to divide large amounts into small portions in shallow containers. Hot food may go directly into the refrigerator, or it may be rapidly chilled in an ice or cold-water bath first.
Plan the landing zone before cooking
Cooling often fails because the meal is ready and every suitable container is still in a cabinet, the refrigerator shelf is full, or the only available vessel is the original deep pot. Treat the end of cooking as another station in the recipe. Before the burner turns on, estimate what the household will eat, what will stay hot for immediate service, and what will become leftovers.
The cooling kit is deliberately plain:
- clean, food-safe shallow containers with intact lids;
- a ladle or heat-safe pitcher that can portion without dangerous splashing;
- a stable tray to carry several containers;
- heat protection appropriate for the pot and work surface;
- an appliance thermometer in the refrigerator;
- labels and a marker that remain legible under condensation;
- an optional basin, sink, or larger vessel for an ice or cold-water bath;
- a clean food thermometer for later reheating checks.
Clear one refrigerator shelf and leave room for cold air to circulate. USDA’s refrigeration guidance says the unit should hold 40°F or below. A built-in setting is not the same as a measured air temperature, so keep an appliance thermometer where it can be read. Do not block a vent with a hot stockpot or pack containers so tightly that air cannot move between them.
This site keeps prices, checkout, inventory, availability, and branded listings disabled until suppliers authorize resale and confirm current commercial terms. You do not need a specialized cooling gadget to follow the core consumer guidance. Clean shallow containers, enough cold capacity, and a disciplined workflow matter first.
Start the two-hour clock at closeout
USDA and CDC tell home cooks to refrigerate perishable foods within two hours of cooking. If food is exposed to an environment above 90°F, use one hour. USDA also frames the two-hour period from the time food is removed from an appliance keeping it hot. That distinction matters at a party: a pot held safely at 140°F or above is in hot holding; a pot switched off and drifting through room temperature is in closeout.
Write the deadline before serving distracts the kitchen. A removable note beside the stove can show:
The clock is an outside limit, not a target wait. Portion the food while the line is staffed and the kitchen is still organized. A common public question asks whether food must reach room temperature before refrigeration. FDA directly rejects that myth: hot food can go into the refrigerator, and smaller containers help it cool faster.
If a perishable batch has already sat beyond the applicable limit, moving it to shallow containers does not reset the clock. Do not taste it to decide whether it is safe. Foodborne hazards may not change smell, appearance, or flavor.
Divide the batch; do not refrigerate the stockpot
A large stockpot stores heat in its dense center. USDA specifically uses soup as the example: one big pot takes a long time to cool, so the batch should be divided among smaller, shallow containers. CDC repeats the same direction for warm or hot food. The goal is more exposed surface area and less distance from the center of the food to cold air.
- Separate service from storage. Put only the quantity needed for the meal into the serving vessel or verified hot-holding setup.
- Set out matched containers. Place them on a stable heat-safe work surface with lids nearby. Avoid glass not intended for sudden temperature changes.
- Portion in a clear direction. Work left to right so an empty container never gets confused with one already filled.
- Keep portions small and shallow. Do not consolidate them back into one deep vessel merely to save shelf space.
- Move the filled set promptly. Carry containers on a tray and load the cleared refrigerator shelf, or move them through the optional bath step.
- Clean the spill path. Wipe handles, container rims, and the shelf if needed so drips do not become tomorrow’s cross-contamination route.
“Shallow” is a process requirement, not a marketing label. Container shape, fill depth, food thickness, starting temperature, refrigerator performance, and spacing all affect cooling. Consumer agencies do not give one universal container depth for every home recipe in the guidance cited here. Choose vessels that create visibly thinner portions and fit the refrigerator with air space around them.
For meat, poultry, or a large roast in the batch, cut the large item into smaller portions before refrigeration. USDA says turkey breast meat should be sliced; legs and wings can remain whole. Apply current product-specific guidance when the meal includes a large intact item rather than assuming liquid-food steps cover it.
Use an ice or cold-water bath when it improves the line
USDA lists an ice or cold-water bath as an option for rapidly chilling hot food before refrigeration. This can help when a batch is very hot, the refrigerator is small, or several containers would add a large heat load at once. It is an acceleration step, not permission to leave the food at room temperature.
- Choose a stable outer vessel. The filled food container must not tip, float, or admit bath water.
- Add cold water and ice around the container. Keep the waterline below the rim and away from the food.
- Stir the food with a clean utensil when the recipe and container allow. Moving the hotter center toward the cooler sides helps even the temperature.
- Refresh the bath as it warms. Melted ice and warm water stop doing useful work.
- Dry the container exterior. Prevent drips from entering the refrigerator or contaminating nearby foods.
- Refrigerate promptly. The two-hour or one-hour outside limit still governs the process.
Do not lower a hot glass container into ice water unless its maker expressly supports that temperature change. Thermal shock can break glass. Do not put a heavy stockpot into a sink that cannot support it, and never carry a sloshing pot through the kitchen when smaller transfer containers are safer.
Load the cold zone like a working shelf
The refrigerator must be at 40°F or below before it receives the batch. Put the new containers on a stable shelf where cold air can reach them. Keep raw meat, poultry, and seafood sealed and positioned so juices cannot drip onto cooked food. Avoid the door for batch leftovers because door temperatures fluctuate with every opening.
Cold capacity
Read the appliance thermometer and confirm open shelf area before the batch finishes.
Thermal load
Use several shallow portions instead of one deep pot holding heat at the center.
Airflow
Leave room around containers; do not stack a hot group into a dense block.
Raw from ready
Protect cooled food from leaks, dirty packaging, and uncooked ingredients.
Cover and protect leftovers according to USDA guidance. Use containers and lids designed for food storage and for the temperatures they will encounter. Replace cracked, badly warped, or permanently stained containers that cannot be cleaned effectively. A lid that rocks on a bowed rim is not a reliable seal.
If the refrigerator struggles to stay at or below 40°F after loading, the batch is larger than the available cold capacity. Reduce future batch size, use more rapid pre-chilling, or arrange adequate cold storage before cooking. The right fix is not to leave the remainder on the counter until space appears.
Label the decision, not just the dish
A container marked only “chili” still forces the next cook to guess. Label the food name and the date it entered the refrigerator. If household members have different dietary needs, include the information they need to choose safely without opening every container. Avoid putting private medical details on containers visible to visitors.
USDA recommends using refrigerated leftovers within three to four days or freezing them for longer storage. Frozen leftovers remain safe indefinitely while continuously frozen, but quality declines over time; USDA gives three to four months as a general freezer-quality window for leftovers. Decide which portions will actually be eaten in the refrigerator window and freeze the rest early.
| Field | Example | What it prevents |
|---|---|---|
| Dish | Turkey chili | Mystery containers and unnecessary opening |
| Refrigerated | Oct. 13 | Guessing when the 3–4 day window began |
| Use or freeze | By Oct. 16–17 | Letting a useful portion age past the plan |
| Contents note | Beans · dairy garnish separate | Mixing add-ons into the wrong serving portion |
Do not backdate the label to the shopping day or the morning prep started. Record when the cooked food entered cold storage. If several days’ ingredients went into the dish, the finished food still needs its own closeout date.
Build the reheat service around 165°F
USDA says leftovers should reach 165°F throughout when reheated. Bring sauces, soups, and gravies to a rolling boil. Use a food thermometer rather than relying on steam at the rim. In a microwave, cover and rotate the food, vent the cover safely, and check temperature in several places because cold spots can remain.
Reheat the portion needed for the meal rather than repeatedly cycling the whole batch. If a frozen portion will be reheated without thawing, USDA says that can be done safely in a saucepan, microwave, or oven, but it takes longer. If thawing first, use the refrigerator, cold water, or microwave. Food thawed by cold water or microwave should be cooked or reheated immediately.
Reheat to 165°F throughout. Bring soup, sauce, and gravy to a rolling boil. Check more than one location in a microwave-heated container.
Run a five-minute batch-cooling audit
The useful upgrade is a line that works on a busy night, not a display of matching containers. After the first large batch, review the sequence while the details are fresh.
Cooling line record
____Portions
____Bath used
Y / NFridge time
____Fridge temp
____Use/freeze
____
- Were enough clean shallow containers ready before cooking ended?
- Could the batch move without crossing the raw-prep zone?
- Did the refrigerator have verified space and a reading of 40°F or below?
- Were labels applied before memory became the system?
- Did every container fit with space for cold air to circulate?
- Could one portion be removed without warming or opening the rest?
If the line missed the deadline, determine why: container shortage, no shelf space, serving delay, an oversized batch, or a refrigerator capacity problem. Fix that constraint before the next large pot. The digital scale audit can also help standardize portion mass when equal containers are part of the workflow, while the two-board prep station keeps raw inputs away from ready-to-eat garnishes during service.
Frequently asked questions
Can hot soup go directly into the refrigerator?
Yes. USDA and FDA consumer guidance allows it. Divide a large batch into small portions in clean shallow containers rather than putting one large stockpot into the refrigerator.
Should I let soup reach room temperature first?
No. Waiting for room temperature spends the limited two-hour window without improving the safety plan. Portion promptly, refrigerate directly, or use an ice or cold-water bath before refrigeration.
How long can refrigerated soup or chili be kept?
Use most refrigerated leftovers within three to four days. Freeze portions sooner when they are not part of the near-term meal plan.
Sources checked
- USDA Food Safety and Inspection Service — Leftovers and Food Safety.
- USDA Food Safety and Inspection Service — Refrigeration and Food Safety.
- U.S. Food and Drug Administration — Refrigerator Thermometers: Cold Facts About Food Safety.
- U.S. Food and Drug Administration — Serving Up Safe Buffets.
- Centers for Disease Control and Prevention — Preventing Food Poisoning, updated November 24, 2025.
Research reviewed October 13, 2026. This home-kitchen guide follows current consumer guidance; food businesses must follow their applicable food code and regulator.